How to Fix Disk Not Ejected Properly on macOS (Tahoe)?

This is a guide to troubleshoot the “Disk Not Ejected Properly” error on your Mac. Learn the possible reasons and figure out the workouts accordingly.
You were working on a project and using an external USB drive to transfer important files to your MacBook. After copying the files, you clicked on the “eject” button. Instead of disconnecting the disk as usual, you received a notification saying the disk was not ejected properly. You tried again, but the same message appeared. You were worried about the potential data loss and came here to eject your disc properly on the Mac.
In this post, we’ll explore why your disk is not ejected properly on your Mac. Then we’ll offer a step-by-step guide on how to fix the issue. Hopefully, your disk can eject without data loss.

Why Is the Disk Not Ejected Properly on Your Mac?
If everything runs smoothly before ejecting the disk, it’s mainly because you’re still running the disk or some other apps are still using the disk. This mechanism prevents you from data loss or file corruption. Thus, check if the disk is closed before ejecting it. If you’ve closed the process but the message still appears, find other causes below.


- The disk itself has faults or errors.
- The potential hardware issues, such as USB cable or port issues.
- A damaged USB cable or port can also cause bad connections.
- The older macOS versions may cause the error.
- If your Mac goes to sleep, the external drive might disconnect improperly.
- You’ve enabled the “put hard disks to sleep when possible” feature.
- Corrupted NVRAM or PRAM can cause various issues, such as improper disk ejection.
How to Eject a Disc Properly on Mac
Before proceeding to other solutions, you can try different measures to eject a disc safely and properly. As mentioned, you should ensure that no files or applications are using the disc currently.


Eject a Disc Properly on a Mac via Finder
- Open Finder on your Mac.
- Look for the disc icon in the sidebar or on the desktop.
- Click on the eject icon to safely eject the disc.
Eject a Disc Properly on a Mac via the Menu Bar
If the disc is mounted and visible in Finder, you can also use the menu bar to eject it.
- Go to the “File” menu in Finder.
- Select “Eject” from the dropdown menu.
Force Eject Using Terminal
If the disc still fails to eject properly, you can use Terminal to force eject it.
- Open Terminal (found in Applications > Utilities.
- Type the command and press Enter: diskutil unmountDisk force /dev/diskX
- Replace /dev/diskX with the actual disk identifier of your disk. You can find this by running diskutil list in Terminal.
How to Fix Disk Not Ejected Properly on Mac
If you fail to eject the disk with the mentioned methods, take the following measures to fix the problem.
Check the USB Cable and Port
You cannot get a stable connection between your computer and the external drive through a damaged or faulty USB cable. Similarly, a bad USB port on your Mac may also hinder the disk from being ejected normally. To determine if it’s a hardware problem, try using a different cable and port with the drive.
Close Background Apps
You might also be running some apps or processes in the background, which are continuing to read files from the external drive. This is one more main reason why you won't be able to eject the disk properly and receive the error message.


Here is a quick way of checking what background apps are running,
- Press and hold the “Option + Command + Esc” keys simultaneously and open the “Force Quit Applications” window.
- Check the current running apps and select the one you want to close.
- Click the “Force Quit” button to close the application.
Run First Aid
The First Aid can help you check and repair common issues with the disk’s file system. It scans the disk, finding errors such as bad sectors, missing files, or incorrect file permissions. By identifying and fixing these issues, your disk will be in a good state. Also, this solution can avoid further issues like this.


- Navigate to Finder, Applications, and Utilities.
- Open Disk Utility and select the external drive or disk you need to check.
- Click the First Aid button at the top and tap on Run to initiate the process.
- Review a report of issues and figure out if there is any issue with your disk.
Reset NVRAM/PRAM
When there are issues with disk settings, the disk won’t eject properly on your Mac. After resetting NVRAM and PRAM, you can clear the memory, which stores the disk management settings. As a result, your macOS will get a fresh start and fix the disk-related problems. To reset NVRAM/PRAM, you can:


- Turn off your Mac.
- Turn on the computer and press and hold the Option, Command, P, and R keys simultaneously.
- Keep holding the keys for 20 seconds before you see the Apple logo.
- Release the keys and allow your computer to start up.
Adjust Energy Saver Settings
Specifically, if you’ve enabled the option “put hard disks to sleep when possible,” you could accidentally put the disk or drive to sleep, which causes disk ejection errors. By modifying Energy Saver settings and disabling this option, you leave the drive active and accessible. This adjustment assists the Mac in keeping a stable connection with the external drive.
- Click the Apple logo and select System Settings.
- Scroll down and click Energy Saver (on desktop Macs) or Battery (on MacBooks).
- Click "Options" and enable "Put hard disks to sleep when possible".
Update Your macOS
If you're using an older version of macOS, then update it. The newer macOS versions can have bug fixes and enhancements that fix issues with disks and drives. Upgrading your system to the latest macOS version ensures the most up-to-date patches and optimizations, which can fix such errors and enhance overall stability.
- Click on the Apple logo in the top left corner and choose System Settings.
- Tap on General and select Software Update.
- If there is an available update, click on the Update Now to proceed.
- When you finish installing the latest version of macOS, restart your Mac.
How to Turn off Disk Not Ejected Properly Mac Notification?
If you don’t want to receive the notification “Disk Not Ejected Properly”, you can turn off the alert. However, you should also note that this will also disable other notifications from Disk Utility.
- Tap on the Apple logo and select System Settings.
- Click on Notifications and scroll down to locate Disk Utility.
- Disable the notifications.
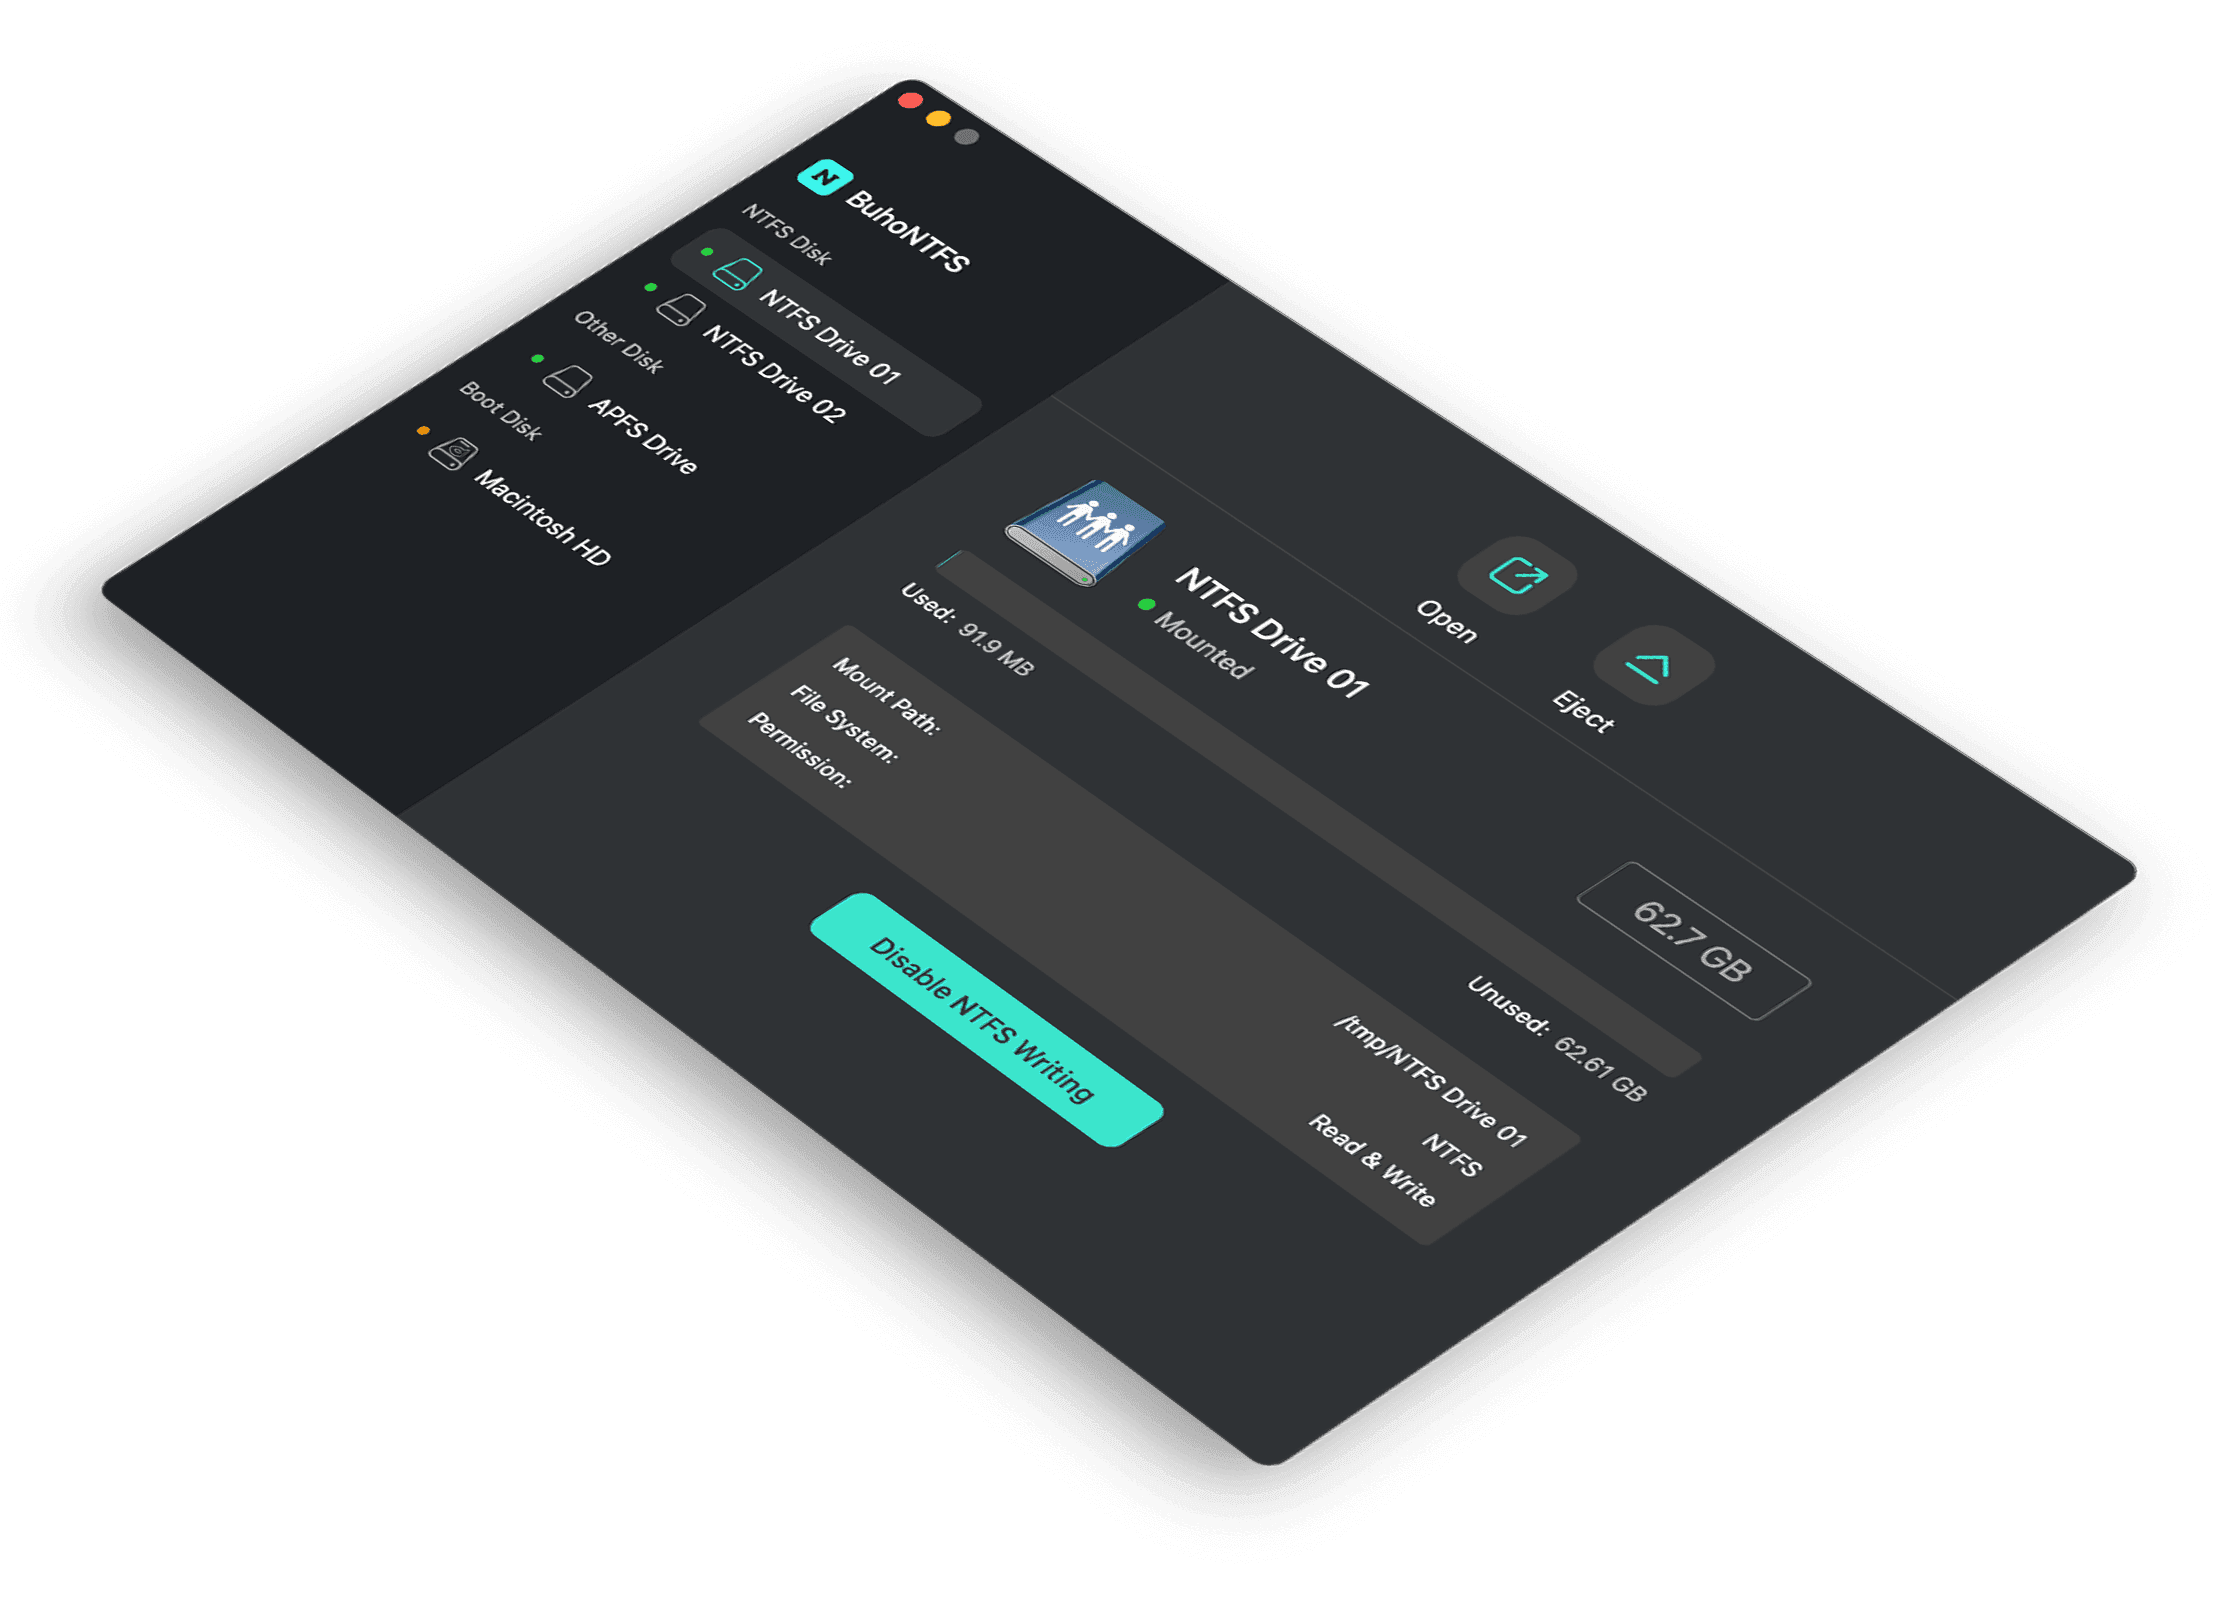
Bonus: How to Write to NTFS Drives on Mac
If you have an NTFS drive and you frequently switch between Windows and macOS, you need an NTFS tool for Mac to write to NTFS drives on Mac, since the NTFS format is read-only on Mac.
BuhoNTFS is exactly what you are looking for. It stands out among many NTFS tools for Mac on the market because it can write to NTFS hard drives without restarting your Mac and lowering the system security level.
Here's how it works.
- Connect your NTFS drive to your Mac.
- Download, install, and launch BuhoNTFS on your Mac.
- Click the Enable NTFS Writing button, and your drive will be opened automatically.
- Write to your drive without any hassle.


Conclusion
Before rejecting the disk on Mac, close the running apps and check the USB port. If the “Disk Not Ejected Properly Mac” keeps popping up on your Mac, use the measures mentioned in this post. Besides, always keep your macOS up to date, because this can ensure both software and hardware operate properly.
Living in Chengdu, Kelly is an Apple technician focused on Mac, iPhone, and iOS repairs. Meanwhile, he's also a columnist at Dr.Buho, with a simple mission to help fix Apple things that are with software or hardware glitches.