- Download and Install
- Downgrade and Uninstall
- Issues and Fixes
How to Downgrade macOS Sequoia to Sonoma [Step-By-Step]

This post explains how to downgrade from macOS Sequoia to macOS Sonoma using three different methods. Read on to learn how to safely roll back to an earlier version of macOS.
Apple released macOS Sequoia on September 16, 2024. Many Mac users updated to macOS Sequoia as soon as it became available.
However, some users may encounter bugs, compatibility issues, or other problems after updating to macOS Sequoia.
Don't worry! This post will show you three ways to downgrade from macOS Sequoia to macOS Sonoma.
![Downgrade macOS Sequoia to Sonoma [Step-By-Step]](/_next/image?url=https%3A%2F%2Fwww.drbuho.com%2Fstr-apiv4%2Fuploads%2Fdowngrade_sequoia_to_sonoma_20b45613d1.png&w=3840&q=100)
Downgrade macOS Sequoia to Sonoma Using Time Machine
Time Machine is Apple's built-in backup tool for Mac. If you have a Time Machine backup created before upgrading to macOS Sequoia, you can erase your Mac and restore that backup to return to the previous version of macOS.
Here's how to downgrade macOS Sequoia to Sonoma using a Time Machine backup:
Step 1: Prepare an External Drive
- Connect a suitable external drive to your Mac for the Time Machine backup. Ideally, the drive should have enough capacity to store your Mac's data and backups.
- If necessary, format the external drive using Disk Utility. Open Disk Utility via Spotlight > Click View > Show All Devices > Select the external drive in the sidebar > Click Erase.

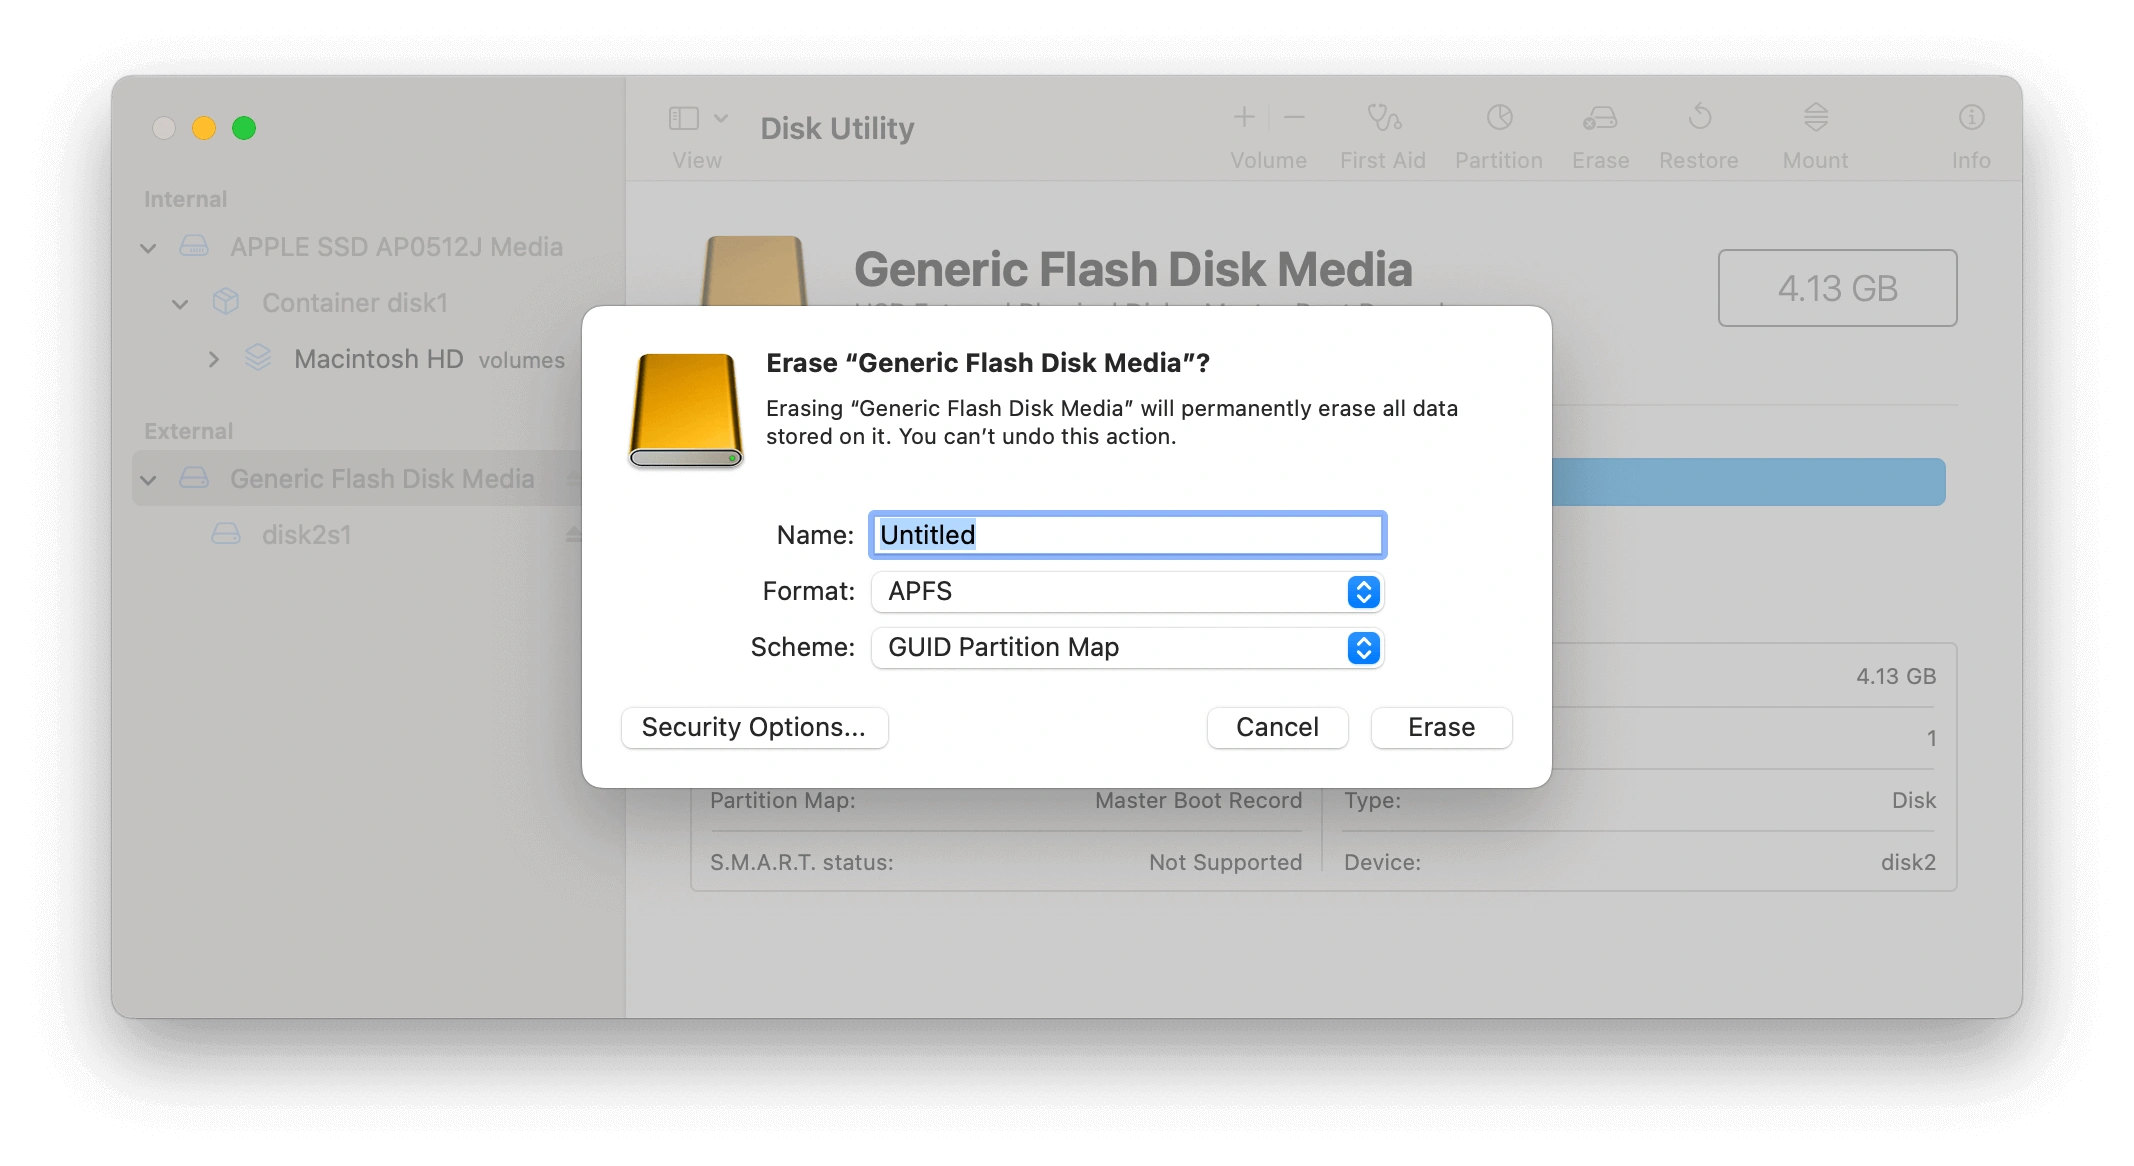
Choose an appropriate file system format:
- APFS (Apple File System): The default file system for modern versions of macOS and generally recommended for SSDs and flash storage.
- Mac OS Extended (Journaled): Commonly used with older Macs and traditional hard drives.
Click Erase > Done.
Step 2: Back Up Your Mac with Time Machine
Click Apple menu > System Settings > General > Time Machine.
Click Add Backup Disk, select the external drive, and follow the on-screen instructions to set it up.
Allow Time Machine to complete a backup before continuing.


Step 3: Erase Your Mac and Restore the Time Machine Backup
Important: Restoring an older Time Machine backup to downgrade macOS generally requires erasing the Mac first. Make sure you have backed up any important files that were created after upgrading to macOS Sequoia.
Connect the external drive containing your Time Machine backup to your Mac.
Start your Mac in macOS Recovery:
- For Macs with Apple silicon: Shut down your Mac. Press and hold the power button until you see the startup options window, then select Options > Continue.
- For Intel-based Macs: Restart your Mac and immediately press and hold Command + R until you see the Apple logo or a spinning globe.
In macOS Recovery, open Disk Utility and erase the internal startup volume or Macintosh HD as required.
Return to the Recovery utilities window and select the option to restore from a Time Machine backup, if available.
Select the Time Machine backup created before you upgraded to macOS Sequoia and follow the on-screen instructions.
Downgrade macOS Sequoia to Sonoma via macOS Recovery
macOS Recovery provides tools for reinstalling macOS, repairing disks, and restoring from backups. However, Recovery does not always let you choose a specific older macOS version such as Sonoma.
On Intel-based Macs, the startup key combinations determine which version of macOS Recovery attempts to install:
- Command + R: Reinstall the current version of macOS installed on your Mac.
- Option + Command + R: Install the latest version of macOS that is compatible with your Mac.
- Option + Shift + Command + R: Reinstall the version of macOS that came with your Mac, or the closest version still available.
Therefore, if your Mac is already running macOS Sequoia, these Recovery options may not directly downgrade it to macOS Sonoma.
For Intel-based Macs
Restart your Mac.
Start your Mac in macOS Recovery using the appropriate key combination:
- Command + R to reinstall the current version of macOS.
- Option + Command + R to install the latest compatible version of macOS.
- Option + Shift + Command + R to reinstall the original macOS version or the closest available version.
If Recovery offers macOS Sonoma or another earlier compatible version, select Reinstall macOS [name].
Follow the on-screen instructions to reinstall macOS.

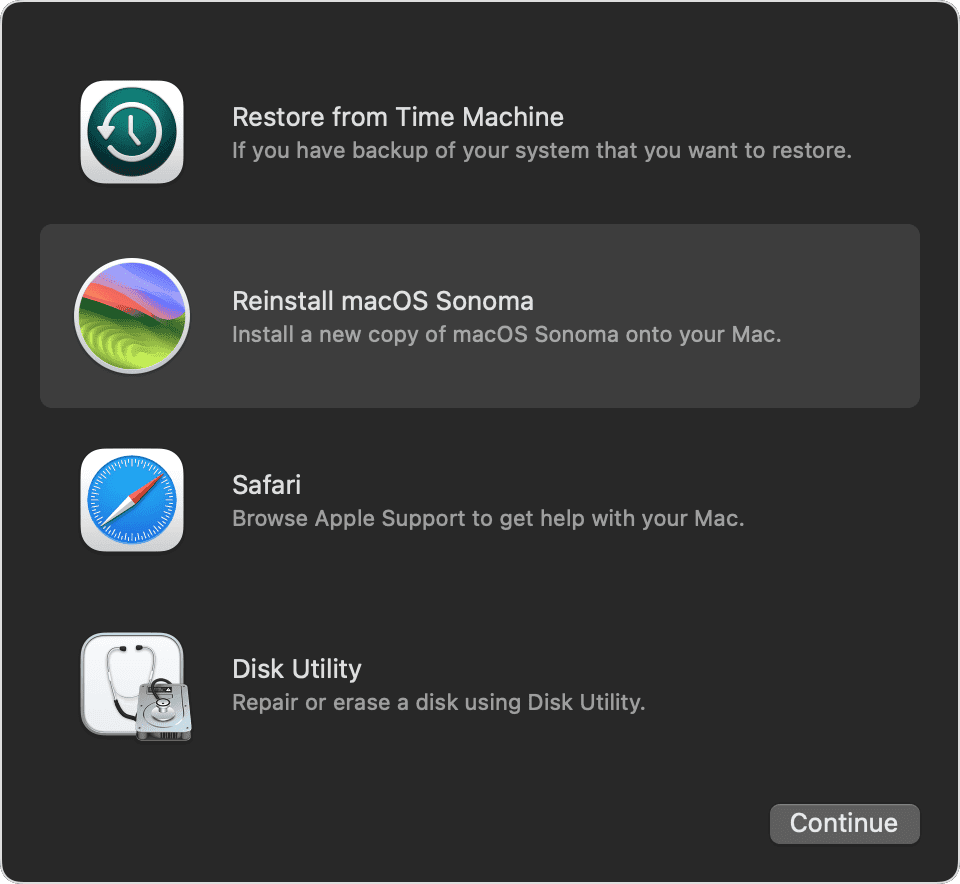
For Macs with Apple silicon
- Shut down your Mac completely.
- Press and hold the power button until you see the startup options window.
- Select Options > Continue to enter macOS Recovery.
- Follow the on-screen instructions to access the available recovery options.
- If Recovery offers the desired macOS version, select Reinstall macOS [name].
- Follow the on-screen instructions to complete the installation.
Downgrade macOS Sequoia to Sonoma via a Bootable Installer
A bootable installer is one of the most reliable ways to install a specific compatible version of macOS, such as macOS Sonoma. Before you begin, check whether your Mac is compatible with macOS Sonoma.
In addition to using Time Machine, you can also downgrade macOS Sequoia by creating a bootable macOS installer. Follow the steps below.
Step 1: Format the External Drive
Connect a USB flash drive or other suitable external storage device to your Mac.
Open Disk Utility via Spotlight > Select the external drive > Click Erase.
For a bootable installer, use Mac OS Extended (Journaled) with GUID Partition Map unless Apple's instructions for your specific macOS version recommend otherwise.
Note: Creating a bootable installer will erase the external drive. Make sure you don't have any important files stored on it.
Step 2: Download the macOS Installer
Download the version of macOS you want to install from the App Store or Apple's official support resources.
After downloading the installer, it should appear in your Applications folder as an app such as Install macOS Sonoma.app.
Step 3: Create a Bootable macOS Installer
- Apple recommends using a USB flash drive or other external storage device with sufficient capacity for the installer. A 32 GB drive provides enough space for current macOS installers, while 16 GB may be enough for some older versions. Terminal will let you know if additional space is required.
- In the command below,
MyVolumeis the name of your external drive. ReplaceMyVolumewith the actual name of your drive. - For more information about creating a bootable installer, see Apple's official macOS bootable installer guide.
- Connect the formatted external drive to your Mac.
- Open Terminal via Spotlight and enter the following command:
macOS Sonoma:
sudo /Applications/Install\ macOS\ Sonoma.app/Contents/Resources/createinstallmedia --volume /Volumes/MyVolume
- Enter your administrator password when prompted and press Enter.
- Confirm that you want to erase the external drive when prompted.
- Wait for Terminal to finish creating the bootable installer.
Step 4: Install macOS Sonoma
For Macs with Apple silicon:
- Shut down your Mac.
- Connect the bootable installer to your Mac.
- Turn on your Mac and continue holding the power button until the startup options window appears.
- Select the bootable installer and click Continue.
- Follow the on-screen instructions to install macOS Sonoma.
For Intel-based Macs:
- Shut down your Mac.
- Connect the bootable installer to your Mac.
- Turn on your Mac and immediately press and hold the Option (Alt) key until the startup options appear.
- Select the bootable installer and press Return.
- When the macOS Utilities window appears, select Install macOS and click Continue.
- Follow the on-screen instructions to complete the installation.
Important: Downgrading macOS generally requires erasing the existing system before installing the older version. Make sure you have a complete backup of your important files before proceeding.
Bonus: Optimize Mac Performance After Upgrading or Downgrading macOS
If your Mac feels slow or its performance has decreased after upgrading or downgrading macOS, BuhoCleaner can help you keep your Mac clean and running smoothly.
With features for cleaning up junk files, monitoring system performance, analyzing disk space, and uninstalling apps, BuhoCleaner makes it easier to maintain your Mac.
Here are some of its core features:
- Free up Mac storage in minutes.
- Uninstall apps completely without leaving unwanted files behind.
- Manage startup items easily.
- Monitor your Mac's system status in real time.
- Analyze disk space and find what's taking up storage.


Conclusion
Hopefully, this guide has made it clearer how to downgrade from macOS Sequoia to macOS Sonoma or another compatible earlier version of macOS.
If you decide to roll back from Sequoia, make sure you have a reliable backup first, then choose the method that best fits your situation.
Wendy is a tech enthusiast with a deep passion for all things iPhone, iPad, and Mac. Wendy is always on the lookout for Apple products and is committed to providing Apple users with some of the latest information and useful tips.