- macOS 27 Installation
- macOS 27 Problems
- 10 Common macOS Golden Gate Problems and Their Fixes
- [Fixed] Spotlight Search Not Working on macOS Golden Gate & Earlier
- 8 Fixes for "AirPlay Not Working on macOS Golden Gate"
- Apps Crashing on macOS Golden Gate? Here's the Fix
- Apps Won’t Open on macOS Golden Gate? 8 Fixes
- Chrome Not Working after Golden Gate Update? Here's the Fix
- macOS Golden Gate 27 Slow? 8 Ways to Speed It Up
- How to Fix "Not Enough Space to Install macOS Golden Gate"
- macOS Golden Gate Battery Draining Fast: 11 Easy Fixes
- macOS Golden Gate Not Downloading? 10 Proven Fixes
- macOS Golden Gate Overheating? Try These 7 Fixes
- macOS Golden Gate Wi-Fi Not Working? Try These 10 Fixes
- Downgrade macOS 27
macOS Golden Gate 27 Slow? 8 Ways to Speed It Up

This article explains why macOS Golden Gate is slow and what you can do to make it run faster.
Updated your Mac to macOS Golden Gate and suddenly everything feels slower? Apps take longer to open, windows feel less responsive, or the fan keeps spinning.
A little slowdown after an update can be normal while macOS finishes background tasks. If it persists, low storage, high memory usage, or too many apps may be the cause. Here’s how to find and fix what’s slowing your Mac down.
Why Is macOS Golden Gate Running Slow?
Here are the most common reasons behind a slow macOS Golden Gate:
- macOS is still doing background work.
- Your startup disk is nearly full.
- Your Mac is running low on RAM.
- One app or process is using too much CPU or memory.
- Too many demanding apps are open at once.
- An app isn’t fully ready for Golden Gate.
- Too many apps are running in the background.
- Your Mac is under more pressure than before.
8 Fixes for the "macOS Golden Gate Slow" Issue
Now that you have an idea of why macOS Golden Gate is slow, let’s look at how to get your Mac back to normal or make it run faster.
1. Just Updated? Give Your Mac Some Time
Before changing anything, give the new system some time to settle.
After updating to macOS Golden Gate, the system may re-index your files, process your Photos library, sync iCloud data, and finish other background tasks. During this period, higher CPU usage, more fan activity, and slower performance aren’t unusual.
2. Check Your Free Storage
A nearly full disk gives macOS less room for temporary files and swap memory, which can affect how responsive your Mac feels.
To check how much space is left on your startup disk, go to Apple menu > System Settings > General > Storage.


If your Mac is low on storage, try the following:
- Delete old downloads and installers.
- Remove large files you no longer need.
- Delete duplicate files.
- Uninstall apps you don’t use.
- Empty the Trash.
Want a quicker way to do that? BuhoCleaner can help. This Mac cleaner can scan your Mac and show large files, duplicates, old downloads, caches, and unused apps in one place, so you can see what’s taking up space without digging through folders manually.


Once you’ve freed up some space, use your Mac normally and see how it feels. If storage isn’t the problem, memory is the next place to look.
3. Check Your RAM
Your Mac can slow down when it runs out of available RAM.
Open Applications > Utilities > Activity Monitor > Memory and look at Memory Pressure at the bottom of the window.

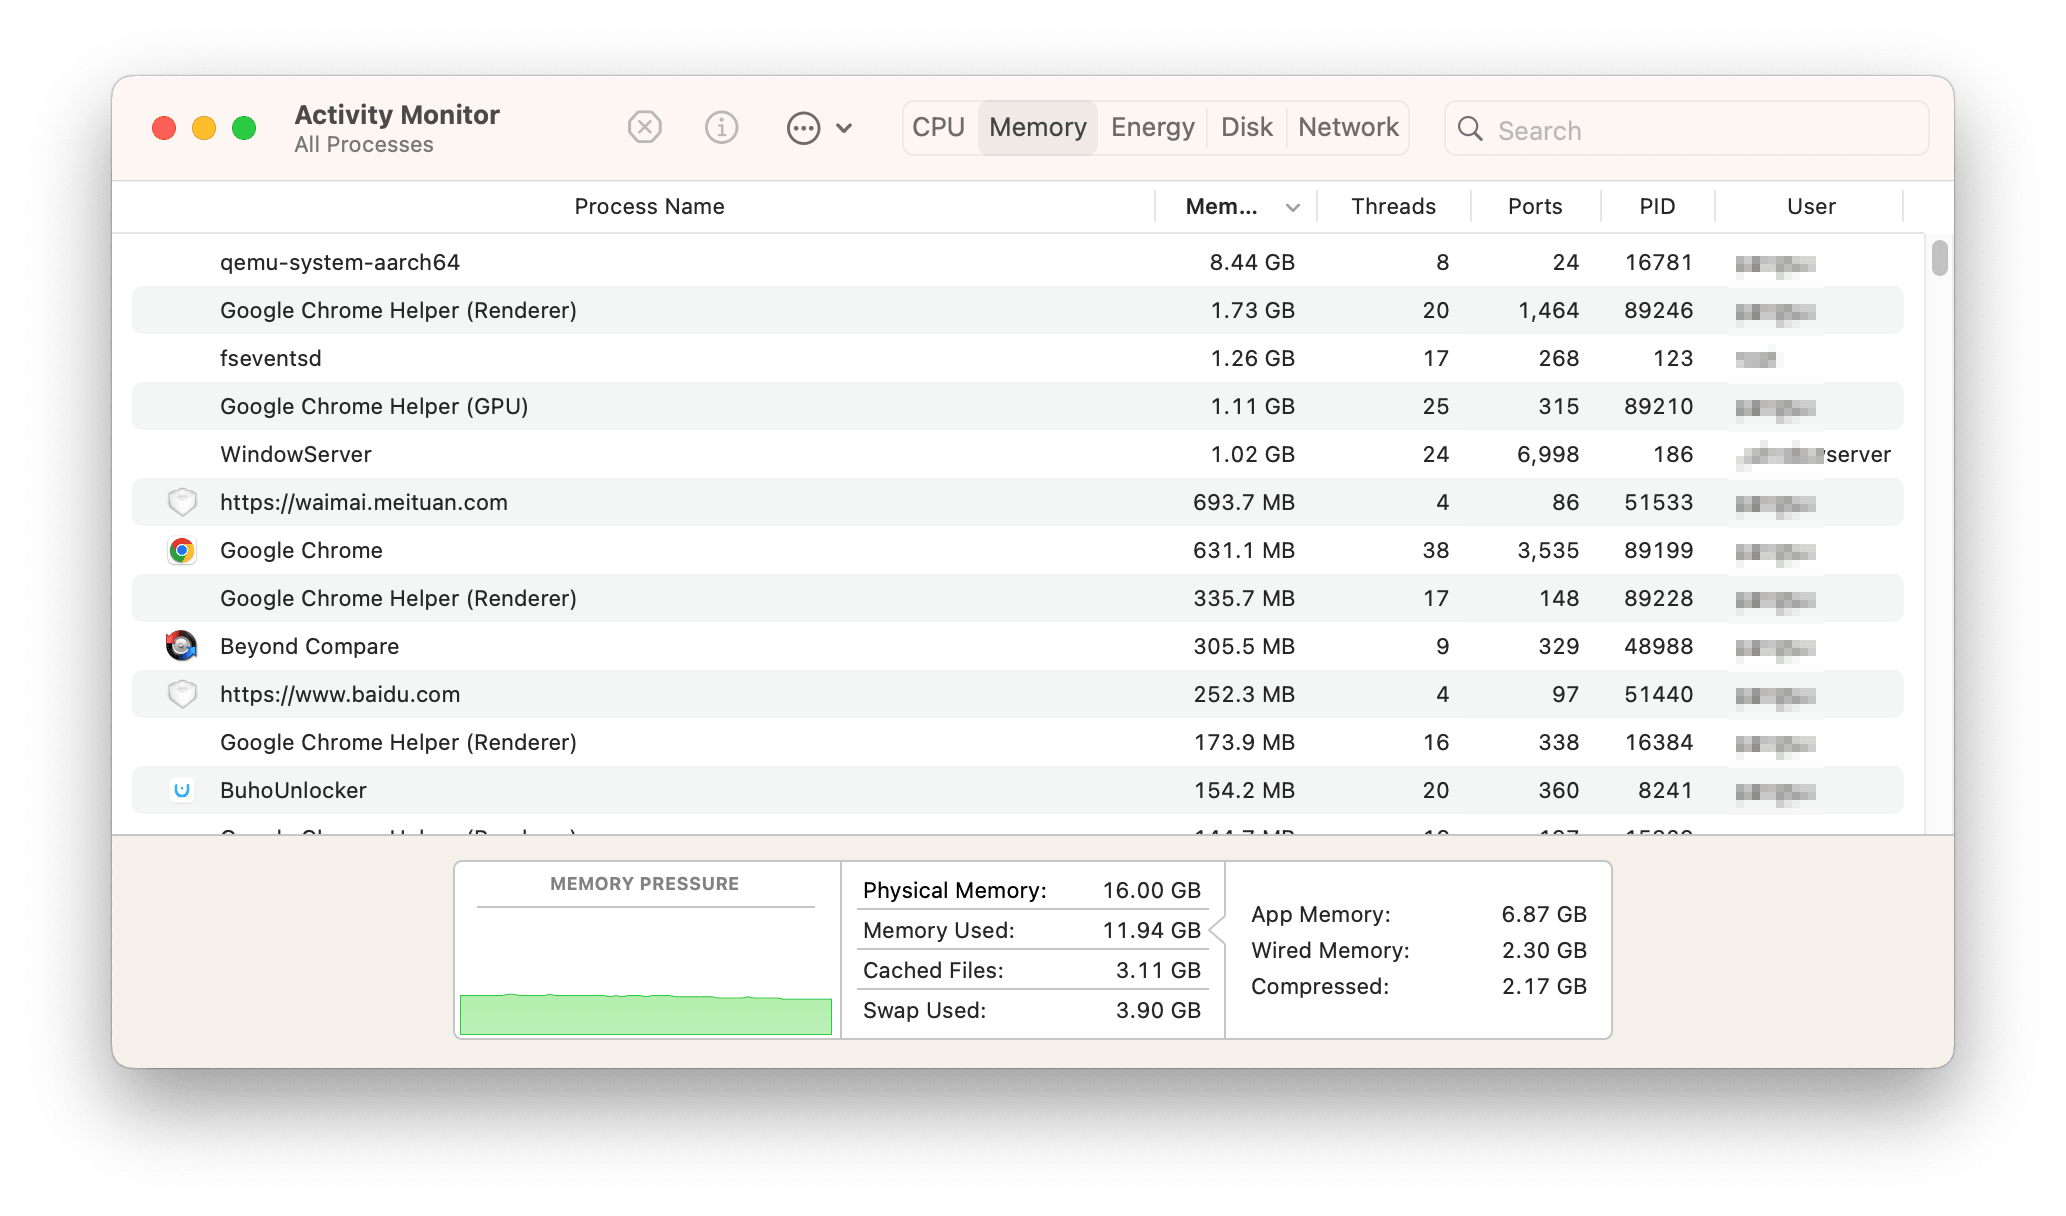
Yellow means your Mac is under memory pressure, while red means it’s struggling with the available memory.
In this case, close the apps that are using the most RAM, such as Google Chrome and AI tools.
4. Find Out What’s Using Your CPU
Memory looks normal? Check the CPU.
In Activity Monitor, switch to the CPU tab and click % CPU to sort the list.


You don’t need to understand every process on the screen. Look for an app or process that’s consistently using a lot of CPU while you’re not doing anything particularly demanding.
Close the related app and see whether your Mac becomes more responsive.
5. Close the Apps You Aren’t Using
A browser full of tabs, Photoshop, Slack, an IDE, a video editor, and a couple of AI tools can put considerable pressure on your Mac when they’re all running together.
Close the apps you don’t need right now and check Activity Monitor again.
6. Check What Starts Automatically
Some apps start every time you turn on your Mac and continue working in the background.
Go to System Settings > General > Login Items & Extensions.
Review Open at Login and remove apps that you don’t need to launch automatically.


Also look at the apps allowed to run in the background. You may find utilities running all the time even though you rarely use them.
7. Restart Your Mac
A restart gives macOS a clean session and makes it easier to see whether those changes helped.
For many users, this is where the Mac starts feeling normal again.
Still sluggish? There’s one more useful test.
8. Try Safe Mode
Safe Mode can help narrow down problems caused by third-party software or startup items.
Start your Mac in Safe Mode and use it normally for a little while. Pay attention to whether the slowdown is still there.
What If macOS Golden Gate Is Still Slow?
If your Mac is still slow after trying all the methods above, the problem may be more specific to Golden Gate or to your particular Mac setup.
Downgrading from macOS Golden Gate to macOS Tahoe or an earlier version is another option. Keep in mind that going back to a previous macOS version involves erasing the startup disk and reinstalling macOS, so make sure your important files are backed up first.
Final Thoughts
It’s frustrating to see your Mac slow down after the macOS Golden Gate update. Luckily, most of the common causes are easy to check and fix.
If none of the methods above work, the problem may come from macOS itself. In that case, you can wait for a new update or try downgrading to another compatible macOS version. Whichever option you choose, don’t forget to back up your Mac first.
Jerome is a passionate enthusiast of all things Apple. He is expertise in crafting tech-related articles, with a portfolio of more than 100 articles covering various Apple products like the iPhone, iPad, and Mac.